I'll be spending the day under the car.
The previous owner claimed that the car was damaged when the transporter loaded it to the trailer (The car was not running at that time). I never thought about it since I used the car on dry roads and I've always rustproofed it.
The previous owner claimed that the car was damaged when the transporter loaded it to the trailer (The car was not running at that time). I never thought about it since I used the car on dry roads and I've always rustproofed it.
The new owner asked me to rivet some plates to close down the openings. Welding would have been tough since there is some sound deadening material inside the car (Would have been OK though under the toe board).
This is the caisson under the toe board (Driver side).
Under the floor behind the engine on the driver side.
This piece will go behind the engine.
I have primed and painted the new plate; this side will go against the floor.
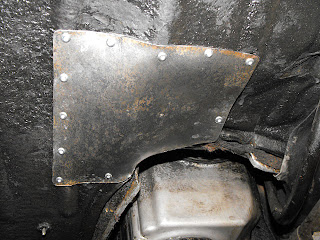
The plate in place, matching the shape of the floor.
Fabricated, primed and coated piece for under the toe board.
In place.
Both pieces after primer and paint.
I've used 3M Strip-Calk for the bigger gaps and a brushable sealer on the seams and rivets.
After 30mn the sealer is paintable, so I gave it another coat to make it nice and not visible. It is looking much better now and it's also waterproof in case of wet roads.
After painting, I've checked all accessible oil pan bolts and torqued some of them.

I have also did two welds on the cross-member under the clutch and painted it; I forgot to take a picture of it.


0 comments:
Post a Comment