Saturday, December 10, 2011

Starter

The starter is somewhere under there... 


Still the original paint on the sphere (Was rebuilt when I bought the car)


Motor mount.


The heat shield was a pain to remove...


... but not as much as the starter!
  

This is the HUGE 10 tooth Ducellier. For a moment I thought I couldn't get it out. 


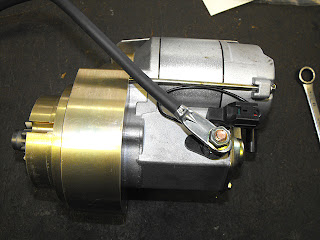
This is the new "John Titus" Offset Gear Reduction starter. The motor is on the top and the solenoid on the bottom. It is much lighter and turn faster than the OEM starter. Since this car has a battery mounted relay, I have made a jumper to connect permanently the solenoid to the positive terminal (The ring connector and wire comes with the starter; a male banana connector is even included for the later DS with no battery mounted relay).


Way smaller than the Ducellier.


The fuel inlet was glued previously by the previous owner but I've added some ligarex just to make sure that it won't get disconnected. 


The new door switch finally showed up.


After rustproofing the car will be ready to be shipped.


Thursday, December 8, 2011

Coolant: Done!

I have drained and flushed the radiator/engine. I've added a gallon of pure coolant since the engine had clear water in it. The protection is -45F; the ratio is probably 60/40 which raises the boiling point also.

The new owner can keep an eye on the spare tire to see if it holds the pressure.


The new starter showed up. I'll be doing the job tomorrow.


Undercarriage repair...

I'll be spending the day under the car.
The previous owner claimed that the car was damaged when the transporter loaded it to the trailer (The car was not running at that time). I never thought about it since I used the car on dry roads and I've always rustproofed it.
The new owner asked me to rivet some plates to close down the openings. Welding would have been tough since there is some sound deadening material inside the car (Would have been OK though under the toe board).  


This is the caisson under the toe board (Driver side).


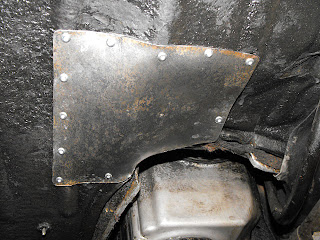
Under the floor behind the engine on the driver side.


This piece will go behind the engine.


I have primed and painted the new plate; this side will go against the floor.


The plate in place, matching the shape of the floor.


Fabricated, primed and coated piece for under the toe board.


In place.


Both pieces after primer and paint.


I've used 3M Strip-Calk for the bigger gaps and a brushable sealer on the seams and rivets.


After 30mn the sealer is paintable, so I gave it another coat to make it nice and not visible. It is looking much better now and it's also waterproof in case of wet roads.


After painting, I've checked all accessible oil pan bolts and torqued some of them.


I have also did two welds on the cross-member under the clutch and painted it; I forgot to take a picture of it.

Tuesday, December 6, 2011

Hydraulic, gear box fluid and starting rustproofing...

Removing the old fluid... 


The filter was not bad at all.


Clean now.


The level is check with the car at the highest level. 


I have check the cycling time: 1:20 mn in high position and 21 sec. in normal driving position. I would call this hydraulic system very healthy; the difference being only due to internal leaks in the suspension cylinders (They are more worn in the middle than at the end).

Two quarts of hydraulic fluid will be in the trunk (Hyken Glacial Blu).


The gear box drain plug was leaking; a new copper washer with some aviation sealer will hopefully cure this recurring problem.


The air duct and cross member has to be removed to access the filler hole.


The gear box takes 2 liters which is over 2 quarts; the extra fluid will be in the trunk.


This is the level hole; if the fairing is out the gear box could be filled this way eventually. When you close the hole, be careful not to unplug the clutch lock return line (Upper left on picture).


I've blown the radiator with compressed air and sprayed some rust proofing material (Especially for the steel frame)


The brake pads have plenty of life in them (Changed them when I purchased the car) 


I have started to prepare the car for the rustproofing treatment...


... drilled holes on the new bumper brackets...


... and the new rear cross member in trunk (Where the lid latches on)


I had to stop due to the lack of light.


Monday, December 5, 2011

Dome lights...

 I have fixed the dome light. One of the bulb socket was touching the ground. 
I've tried to fix the left door switch but it is working only 99% of the time, so I am waiting for a brand new $25 switch.


The weather is going to be nice today; I'll be doing the fluid changes (Gear box and coolant).
I hope to get the new starter on Wednesday.